The following videos may contain content or elements used in other training series. Don’t let that confuse you because the overall tasks are the same. If you have questions about doing these tasks while using a different piece of software, just let me know and I’ll do my best to help.
Follow the ‘technique’ and you’ll do perfectly. Of course, if you have questions, your answer is just an email away. Contact Us
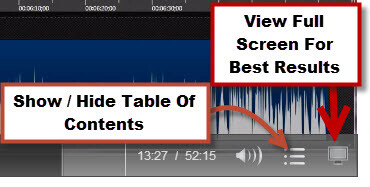
This first bonus video covers several editing and repurposing techniques. It is just under 1 hour BUT, it is broken into different chapters which you can click on to get to that section easily. You can toggle on & off the table of contents as shown in the following image as well as view in fullscreen mode, which is best in my humble opinion.

Here is a short video on a Download Manager I use and how I use it. If you use a different one, please let me know and I’ll have a look at it and let you know my thoughts.
One of the items included in the Camproj folder is a PSD image file for the videos splash-screen also known as the opening images (or Title Screen) to each video. This video guide will show you in detail, how to edit that PSD file and create custom splash-screens for your branded videos.
This video was created using a PSD file from a different set of videos so do not get confused when the names you see on the video files do not match with the names on the video files from your purchase. Follow the ‘technique’ and you’ll do perfectly. Of course if you have questions, your answer is just an email away. Contact Us
This video has a clickable table of contents and might take a few seconds to fully load. Once you click on the big white play button (arrow), you can hover your mouse over the video to see and click on the different segments of the video to quickly access those. Or you can just let the video play all the way through – its 9 minutes long.
There are a couple of different ways to add splash-screens also known as the opening/closing images (or Title & credit Screen) to your PLR Videos in order to brand them with your message & call-to-action.
One way is to use Camtasia Studio 8 & I demo that in the Bonus PLR Video at the top of this page. Just click play on that video and with your cursor over the video you’ll see the Table of Contents on the left side of the video. Section 4 is on the splash-screen.
The Following video shows how to add the videos splash-screen also known as the opening images (or Title Screen) to each video using the FREE & Opensource video editor called OpenShot.
How to add a branding watermark to your videos.
This is one of the quickest & easiest ways to add a branding element to your PLR videos.
To see how this is done using Camtasia Studio 8, refer to section 5 of the Bonus PLR Video at the top of this page.
The Following video shows how to add your watermark using That previously mentioned Free & Opensource video editor called OpenShot
This video details how to edit the sales and thank you pages that are included in the marketing package.
There are some tips that might help you even if you are familiar with this process already. So give it a look-see and contact me if you have questions, suggestion or comments.
Please contact me if you have any suggestions, questions or comments.
Thank you for your business.
Sincerely,
Steve Dougherty
[email protected] or use the contact us form
